SceneBuilder
Learning Objectives
- Be able to use the SceneBuilder tool to create JavaFX user interfaces.
- Be able to connect an FXML file with a controller class.
important
From this chapter onward, you will need the SceneBuilder tool.
Install it by following the ../tyokalut.md#scenebuilder.
SceneBuilder is a visual tool that makes creating JavaFX user interfaces easier. It provides a drag-and-drop interface that allows you to create and modify the user interface defined in an FXML file without writing FXML by hand. With SceneBuilder, you can easily add components, configure their properties, and arrange them as desired. It is particularly useful if you are not yet comfortable writing FXML directly or if you want to speed up the user-interface design process.
The main SceneBuilder window consists of three primary areas.
The First Component
Let's begin by opening the project's main.fxml view file in SceneBuilder.
Open SceneBuilder and select Open Project from the lower left corner.
Locate and open main.fxml from the src/resources/package directory (package here refers to the package hierarchy of the project created in the previous chapter).
The same user interface that we previously saw in IDEA should now be visible in SceneBuilder.
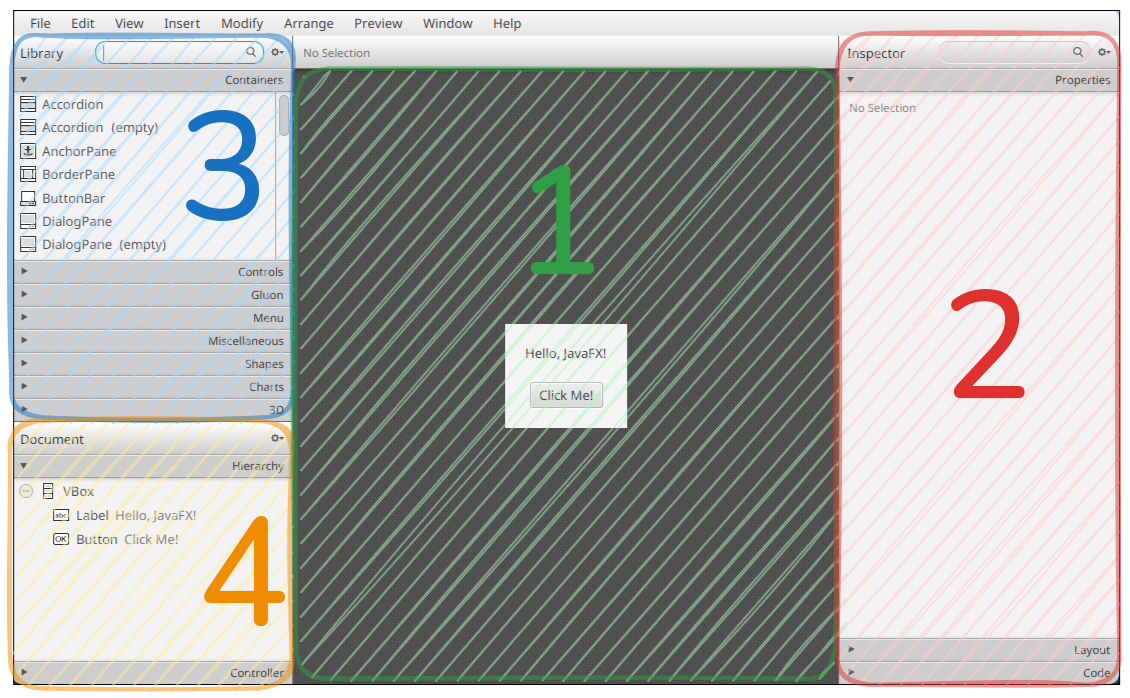
Let's also familiarize ourselves with the SceneBuilder interface:
- Design View. This displays the user interface defined by the FXML file as a visual representation. You can drag components around and arrange them however you like.
- Inspector View. Here you will find panels such as Properties, Layout, and Code. These allow you to modify the selected component's properties, such as text, font, color, layout settings, and the configuration required for connecting the component to a controller.
- Library View. This contains all available components, including buttons, text fields, layout components, and more. Components can be added to the interface by dragging them into the design view.
- Document View. This displays all components in your application as a tree structure. You can use this view to precisely select, move, and remove components.
The design view already contains a Button component and a Label component.
If you click the Button component, the Properties panel on the right displays its properties.
You can modify its text, font, color, and many other settings.
As a first exercise, let's change the button's text. Click the button in the design view. The component's basic properties appear in the Inspector's Properties panel.
Change the button's Text property to
Add Task
and press Enter.
Notice that the button text immediately updates in the design view.
Save the changes (File → Save). Now run the application again through IDEA. You should notice that the button text has changed.
The Hierarchical Structure of the User Interface
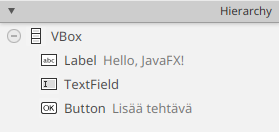
In the Document panel on the left, you can see the user-interface structure as a hierarchy.
The Button and Label components are children of a VBox component.
VBox (Vertical Box) is a layout component that automatically arranges its child components vertically.
JavaFX provides many similar classes derived from Pane, which help organize the interface into logical structures instead of placing all components directly under the application window.
HBoxarranges children horizontally.GridPanearranges children in a grid.BorderPanearranges children around the edges and center.- and so on.
These components make it possible to build even complex user interfaces that scale gracefully to different window sizes.
A Text Input Field
Next, let's add a text field where the user can type.
In the Library view, select:
Controls → TextField
and drag it inside the VBox, between the label and the button.
(If you accidentally drop the text field in the wrong place, you can undo the change with Ctrl+Z or ⌘+Z.)
Save the changes (File → Save) and run the application again in IDEA.
A text field should now appear, allowing the user to enter text.
Bonus: Where is the user interface defined?
Open main.fxml from the resources directory in IDEA.
The file should now look approximately like this:
<?xml version="1.0" encoding="UTF-8"?>

<?import javafx.geometry.Insets?>
<?import javafx.scene.control.Button?>
<?import javafx.scene.control.Label?>
<?import javafx.scene.control.TextField?>
<?import javafx.scene.layout.VBox?>

<VBox alignment="CENTER" spacing="20.0" xmlns="http://javafx.com/javafx/25" xmlns:fx="http://javafx.com/fxml/1" fx:controller="fi.jyu.ohj2.dezhidki.MainController">
    <padding>
        <Insets bottom="20.0" left="20.0" right="20.0" top="20.0" />
    </padding>

    <Label text="Hello, JavaFX!" />
   <TextField />
    <Button text="Add Task" />
</VBox>
The FXML file contains a textual description of the user interface. Compare the file contents with the hierarchy shown in SceneBuilder.
SceneBuilder is essentially an application that can read and generate FXML user-interface files.
Connecting FXML and a Controller Class
At this point, clicking the button does nothing. To handle user-interface events such as button presses, we need to create a connection between the FXML file and the controller class. This happens in two steps: Assign identifiers to components in SceneBuilder and define matching variables in Java code.
Assigning Identifiers to Components
Every component we wish to access programmatically must have a unique identifier in FXML. Let's start by giving identifiers to the text field and button and then print the contents of the text field to the console.
Select the text field in SceneBuilder and open the Code panel in the Inspector.
Set the fx:id field to a unique camelCase name describing the component, for example:
newTaskName
Press Enter to confirm.
Repeat the process for the button and assign it the identifier:
addNewTaskButton
Finally, save the FXML file.
Defining Components in the Controller
You may have noticed that immediately after assigning an identifier, SceneBuilder displays a warning:
No injectable field found
Let's fix that by adding matching fields to the controller class.
For now, you can clear the warning by pressing Clear, as SceneBuilder does not automatically refresh warnings.
Return to IDEA and open MainController.java.
Add two fields near the beginning of the class:
@FXML
private Button addNewTaskButton;

@FXML
private TextField newTaskName;
Add any missing imports from the javafx.scene.control package for Button and TextField.
important
The variable name must exactly match the corresponding fx:id value defined in SceneBuilder.
JavaFX connects components and fields using these identifiers. If they do not match, JavaFX cannot link them together.
Run the application again. It should behave exactly as before.
What did this actually do?
When the application starts, the FXMLLoader defined in App reads the main.fxml file and notices the components and their fx:id values.
It then creates an instance of MainController and searches for fields marked with the @FXML annotation.
Finally, it assigns the actual component objects to those fields by matching the field names against the corresponding fx:id values.
In other words, FXMLLoader effectively performs something similar to:
// Do not copy.
// FXMLLoader does this automatically using
// the field name and fx:id value.

this.newTaskName =
    (TextField)findComponentById("newTaskName");

// After this assignment, newTaskName refers
// to the TextField object defined in the view.
The Controller Lifecycle and the initialize Method
If a controller implements the Initializable interface, JavaFX automatically calls its initialization method once the FXML file has been fully loaded and all controller fields have been initialized.
This is the correct place to define component behavior.
Let's add the following line to initialize() to verify that the text-field object is available:
newTaskName.requestFocus();
Run the program again. Immediately after startup, the text field should become active and receive the keyboard focus, as if it had been clicked.
Handling Events
Setting focus is not particularly exciting. Let's add functionality so that clicking the button prints the text field contents to the console.
In JavaFX, all interactions with components produce events. For example:
- clicking a button,
- pressing a key in a text field,
- copying text,
- pasting text,
all generate different events. User-interface programming largely consists of defining visible components and responding to their events.
In JavaFX, event handling is usually implemented using methods beginning with setOn.
These methods accept either a lambda expression or a method reference that is executed when the event occurs.
Let's add a generic action event handler using setOnAction.
The action event occurs whenever the user interacts with a component in its standard way.
For buttons, this happens when the button is clicked or when Enter is pressed while the button has focus.
For other components, an action event may represent a different component-specific interaction.
Add the following event handler inside initialize():
addNewTaskButton.setOnAction(event -> {
    String text = newTaskName.getText(); // Retrieve text field contents

    IO.println("Text field contents: " + text); // Print to console
});
Additional Information: Why Not Add the Handler in the Constructor?
The reason is related to the JavaFX initialization sequence and when FXML components become available.
When a JavaFX application starts:
- JavaFX creates the controller by calling
new MainController(). - At this point, all
@FXMLfields are stillnull. FXMLLoaderreads the FXML file and injects the actual components into the fields based on theirfx:idvalues.- Finally,
initialize()is called.
If you attempt to use FXML components in the constructor, you will get a NullPointerException.
For example:
public MainController() {
    newTaskName.requestFocus();
    addNewTaskButton.setOnAction(event -> {
        String text = newTaskName.getText();
        IO.println(text);
    });
}
In the code above, both addNewTaskButton and newTaskName are still null during construction.
That is why event handlers and other initialization code involving FXML components belong in initialize().
Save and run the application. Now whenever the button is clicked, the contents of the text field are printed to the console.
We now have a graphical version of "Hello, World!" 🥳
Displaying the Text in the Window
Printing to the console is useful, but in a real application the console is rarely visible to the user. Let's modify the application so that the text entered into the text field is added to the label above it.
Open SceneBuilder and select the Label component currently displaying
"Hello, JavaFX!"
In the Inspector's Properties panel, remove all text from the Text property.
The label should become empty.
img src="images/scenebuilder-label-cleanup.png">
Next, assign an fx:id value in the Code panel.
For example
pendingTasks
Save the FXML file.
Add a matching field to the controller:
@FXML
private Label pendingTasks;
Add any required imports.
If IntelliJ offers multiple Label classes, choose the one from:
javafx.scene.control
Now modify the event handler created earlier so that the entered text is added to the label.
addNewTaskButton.setOnAction(event -> {
    String text = newTaskName.getText();

    // HIGHLIGHT_RED_BEGIN
    IO.println("Text field contents: " + text);
    // HIGHLIGHT_RED_END

    // HIGHLIGHT_GREEN_BEGIN
    pendingTasks.setText(pendingTasks.getText() + text + "\n");
    // HIGHLIGHT_GREEN_END
});
Save and run the application. Now clicking the button adds the entered text to the label above the text field, one line at a time.
You may notice that adding a second line is not visible unless the window is enlarged. We will address layout and window-sizing issues later in this tutorial.
Return the project you advanced in Exercise 7.2.
Recap of the steps in this part:
- In SceneBuilder, add your own
TextFieldcomponent inside theVBoxin the FXML file. - Add an
onActionevent handler to the button that adds the text entered into the text field to theLabelcomponent. - Display all tasks in the
Labelcomponent, separating them with line breaks.
Return your project files.