Component Layout
Our application is functionally complete, but there are still a few issues with its appearance:
- The default window size is too large.
- Resizing the window leaves empty space in the wrong places.
- The component layout needs some refinement: the checkboxes are too close together, the labels are centered oddly, and the button is far away from the input field.
Let's improve the application's appearance and become familiar with HBox, the close relative of the VBox container.
Open the application's main.fxml file in SceneBuilder.
Immediately select:
View → Show Outlines
or press Ctrl+E (macOS: Cmd+E).
This makes components appear as boxes, making it easier to understand their size and position.
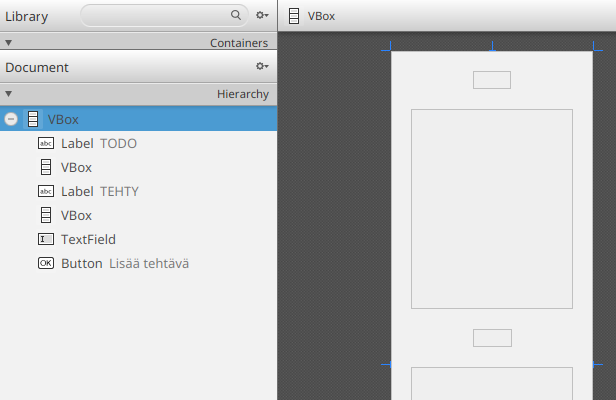
After completing this chapter, you can return to the normal view using: View → Hide Outlines
Window and Component Size
Let's begin by fixing the window size.
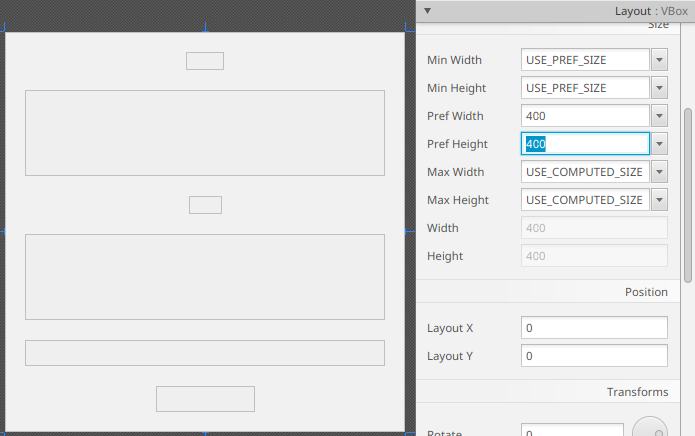
Select the VBox that contains the entire application from the Hierarchy panel on the left and open the Layout panel on the right.
The Layout panel contains size-related properties. In JavaFX, every component has three types of width and height:
- Preferred size (
Pref WidthandPref Height): the default size when the view is loaded. The actual size may still change depending on the component itself and the surrounding layout. - Minimum size (
Min WidthandMin Height): the smallest size to which the component may shrink. - Maximum size (
Max WidthandMax Height): the largest size to which the component may grow.
You can assign decimal values or use the following special values:
USE_COMPUTED_SIZE: JavaFX calculates the most appropriate size from the component's contents.USE_PREF_SIZE: JavaFX uses the preferred size (Pref). Useful for restricting component size.
Set the following values for the root VBox:
- Min Width:
USE_PREF_SIZE - Min Height:
USE_PREF_SIZE - Pref Width:
400 - Pref Height:
400 - Max Width:
USE_COMPUTED_SIZE - Max Height:
USE_COMPUTED_SIZE
In other words: initialize the view at 400×400 pixels, do not allow it to shrink below that size, but allow it to grow freely. You should immediately see the change in SceneBuilder.
Save the FXML file and launch the application. The default window size is now 400×400.
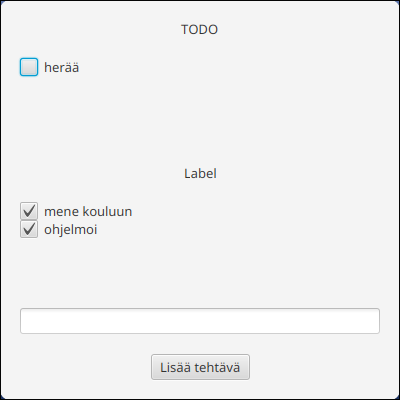
However, the window can still be resized smaller than 400×400 because we only modified the view's limits, not the window (Stage) itself.
Let's fix that by setting the minimum window size in the start method of the App class.
At the same time, we'll give the application a nicer title:
public void start(Stage stage) throws IOException {
    FXMLLoader loader = new FXMLLoader(getClass().getResource("main.fxml"));
    Scene scene = new Scene(loader.load());

    stage.setScene(scene);
    // HIGHLIGHT_GREEN_BEGIN
    stage.setMinHeight(400);
    stage.setMinWidth(400);
    // HIGHLIGHT_GREEN_END
    // HIGHLIGHT_YELLOW_BEGIN
    stage.setTitle("Todo Application");
    // HIGHLIGHT_YELLOW_END
    stage.show();
}
Now when you run the application, the window can no longer be resized below 400×400.
Spacing Between Components in a VBox
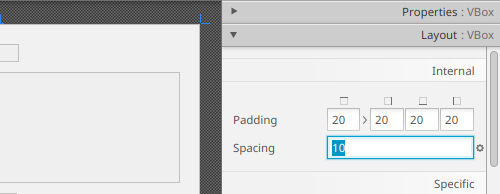
The VBox component contains a Spacing property that defines the amount of empty space between its child components.
Notice that the main VBox currently has a spacing value of 20, which is a bit too large.
Change it to 10:
Let's also fix the task-list containers, whose checkboxes currently have no space between them.
Set the Spacing value of both task-list VBox containers to 5.
Save the FXML file and run the application.
You should now see a small amount of space between checkboxes.
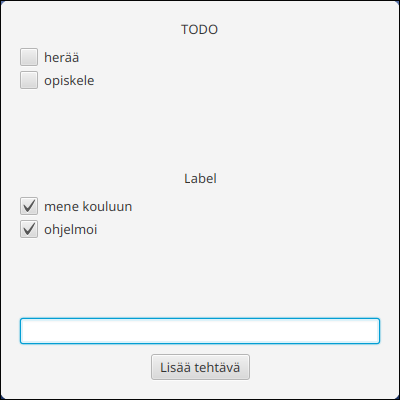
Growing Components When a VBox Grows
Resizing the window reveals another issue: the completed and pending task lists do not grow along with the window.
By default, a VBox keeps the height of its child components unchanged.
However, each component can specify how it should behave when extra space becomes available.
In this case, we want the task lists to expand while other components (labels, text fields, buttons) remain unchanged.
Select the VBox containing pending tasks and open the Layout panel.

Whenever a component is inside a VBox, it can be assigned a Vgrow setting.
This setting controls how the component's height behaves when its containing VBox grows.
The available values are:
NEVER: Height never changes.ALWAYS: Always fills available space. If multiple components use this setting, they share the available space.SOMETIMES: Grows only if nothing else can be expanded.
Set the pending-task container's Vgrow value to
ALWAYS.
Do the same for the completed-task container.
Now both containers will grow proportionally.
Save and test the application. The task lists should now expand vertically with the window while the remaining components keep their original size.
Placing the Button on the Same Row as the Text Field
Currently, the text field appears somewhat disconnected from the button. In most applications, buttons related directly to a text field are placed on the same row.
Since VBox always arranges components vertically, we need its horizontal counterpart: HBox (Horizontal Box).
As its name suggests, an HBox arranges its child components horizontally from left to right.
Add an HBox below the completed-tasks section and drag the text field and button into it.
Configure the HBox with the following settings:
- Spacing:
10(adds empty space between the text field and button) - Pref Width and Pref Height:
USE_COMPUTED_SIZE(the container size adapts to its contents) - Vgrow:
NEVER(the container height never changes even if the surroundingVBoxgrows)
Finally, select the TextField and set its Hgrow value to
ALWAYS
This is the horizontal equivalent of Vgrow inside a VBox.
The text field will now fill all remaining horizontal space.
Left-Aligning the Labels
Let's make one final adjustment. Applications commonly align labels to the left edge. Let's update the alignment to make the interface feel more familiar.
Select the root VBox and set its Alignment property in the Properties panel to
CENTER_LEFT:

Save and run the application. Verify that everything still works correctly and that the components adapt nicely when the window is resized.
Return the project you advanced in Exercise 7.6.
Recap of the steps in this part:
- Set the minimum size of the view and window to 400×400 pixels.
- Add a small amount of empty space between the check boxes using the
spacingproperty. - Make the completed and incomplete task lists grow when many tasks are added.
- Place the button and text field on the same row using an
HBoxcontainer. - Align the labels to the left.
When the phase is complete, run git add for the modified files and create a git commit.
Return your project files.