Multiple Views and Task Editing
It is very common for an application to contain multiple views in addition to the main window.
JavaFX allows views to be loaded and displayed in three different ways.
First, the view displayed in the main window can be replaced using the stage.setScene() method, as we mentioned in Part 7.1.
Second, a view can be loaded and embedded inside another view. For example, we could add tabs to the main window and place each tab's contents in its own view.
Third, we can create new windows that display a desired view. These windows may operate alongside the main window, or they may be modal. A modal component requires the user's attention. While it is open, the main window cannot be used. Modal windows are useful for dialogs that request input from the user and prevent the user from continuing until the dialog has been closed.
In this chapter, we will focus on the third approach. We will create a dialog that allows the user to edit the detailed information of a task. The dialog will open whenever the user double‑clicks a task.
Preparation: Adding More Information to Tasks
Let's first modify the Task class by adding more information to it.
We would like each task to contain:
- A title, which is displayed in the table
- A completed/not-completed state, as before
- A more detailed description
- A priority with three allowed values: low, medium, high
The first two are already handled by the current task attributes. A description can be modeled as a string.
A priority could be modeled using numbers 0, 1, and 2. However, Java provides a special type for situations like this: an enumeration (enum).
For example, a priority can be modeled as:
// Enumeration type Priority
// Priority allows only three possible values: LOW, MEDIUM, HIGH
public enum Priority {
    LOW, MEDIUM, HIGH
}

// Example usage
void main() {
    Priority priority = Priority.LOW;
    IO.println(priority);
}
Enum values can be stored in variables and attributes just like ordinary objects, but the value must always be one of the values defined by the enumeration.
Create a new file Priority.java inside the model package:
package fi.jyu.ohj2.name.todo.model;

public enum Priority {
    LOW, MEDIUM, HIGH
}
Next, extend the Task class by adding new properties for the description and priority.
At the same time, let's rename the text property to title:
public class Task {
    // HIGHLIGHT_YELLOW_BEGIN
    private final StringProperty title = new SimpleStringProperty("");
    // HIGHLIGHT_YELLOW_END
    // HIGHLIGHT_GREEN_BEGIN
    private final StringProperty description = new SimpleStringProperty("");
    // HIGHLIGHT_GREEN_END
    private final BooleanProperty completed = new SimpleBooleanProperty(false);
    // HIGHLIGHT_GREEN_BEGIN
    private final ObjectProperty<Priority> priority = new SimpleObjectProperty<>(Priority.MEDIUM);
    // HIGHLIGHT_GREEN_END

    @SuppressWarnings("unused")
    public Task() {}

    // HIGHLIGHT_YELLOW_BEGIN
    public Task(String title, boolean completed) {
        setTitle(title);
    // HIGHLIGHT_YELLOW_END
        setCompleted(completed);
    }

    public boolean getCompleted() { return this.completed.get(); }
    public void setCompleted(boolean completed) { this.completed.set(completed); }
    public BooleanProperty completedProperty() { return this.completed; }

    // HIGHLIGHT_YELLOW_BEGIN
    public String getTitle() { return this.title.get(); }
    public void setTitle(String title) { this.title.set(title); }
    public StringProperty titleProperty() { return this.title; }
    // HIGHLIGHT_YELLOW_END

    // HIGHLIGHT_GREEN_BEGIN
    public String getDescription() { return description.get(); }
    public void setDescription(String description) { this.description.set(description); }
    public StringProperty descriptionProperty() { return this.description; }

    public Priority getPriority() { return this.priority.get(); }
    public void setPriority(Priority priority) { this.priority.set(priority); }
    public ObjectProperty<Priority> priorityProperty() { return this.priority; }
    // HIGHLIGHT_GREEN_END

    @Override
    public String toString() {
        return getTitle() + ": " + (getCompleted() ? "DONE" : "NOT DONE");
    }
}
Notice that renaming the text property requires updating the getter, setter, property methods, and all references in the controller.
You can perform this easily by placing the cursor on the symbol, right-clicking, and selecting Rename.
Alternatively, you may rename everything manually.
Remember that MainController also contains references to textProperty(), which must be updated.
Save the changes.
When you run the application now, you will notice that titles disappear from old tasks since the field name changed.
Because we are only testing the application, simply delete tasks.json from the project.
If IDEA asks whether to perform a Safe Delete, disable it.
Creating the New Editing View
Let's create a new view for the upcoming dialog. Remember that every user interface needs both a view (FXML) and a controller class. We begin with the view.
Open SceneBuilder and choose the Empty template from "New Project from Template".
Immediately save the new FXML file.
Place it in the same directory as main.fxml:
src/main/resources/fi/jyu/ohj2/name/todo
Name the file
task-edit.fxml
Then build the following user interface in SceneBuilder.
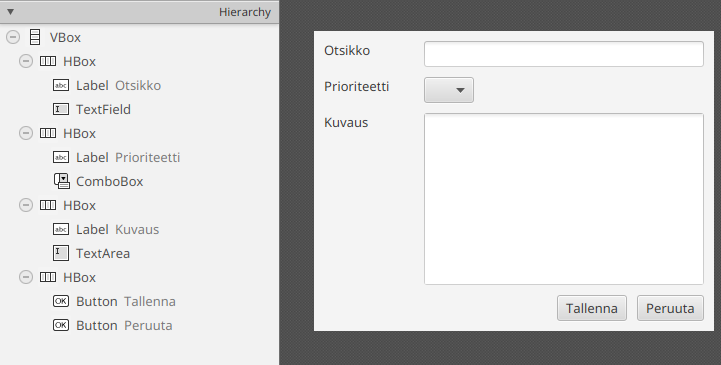
Configure the components as follows:
- VBox container
- Spacing:
10 - Padding:
10on all sides - Pref Width:
400 - Pref Height:
300
- Spacing:
- All Label components
- Min Width:
100 - Other Width and Height settings:
USE_COMPUTED_SIZE
- Min Width:
- HBox containers for the title field, priority field, and buttons
- Vgrow:
NEVER
- Vgrow:
- HBox containing the description field
- Vgrow:
ALWAYS
- Vgrow:
- HBox containing the buttons
- Alignment:
TOP_RIGHT - Spacing:
10
- Alignment:
- TextField, ComboBox, and TextArea
- Hgrow:
ALWAYS - Width and Height settings:
USE_COMPUTED_SIZE
- Hgrow:
Assign the following fx:id values:
- Title TextField:
titleField - Priority ComboBox:
priorityCombo - Description TextArea:
descriptionField - Save Button:
saveButton - Cancel Button:
cancelButton
Save the FXML file.
You can also copy the complete FXML file here
<?xml version="1.0" encoding="UTF-8"?>

<?import javafx.geometry.Insets?>
<?import javafx.scene.control.Button?>
<?import javafx.scene.control.ComboBox?>
<?import javafx.scene.control.Label?>
<?import javafx.scene.control.TextArea?>
<?import javafx.scene.control.TextField?>
<?import javafx.scene.layout.HBox?>
<?import javafx.scene.layout.VBox?>

<VBox maxHeight="-Infinity" maxWidth="-Infinity" minHeight="-Infinity" minWidth="-Infinity" prefHeight="300.0" prefWidth="400.0" spacing="10.0" xmlns="http://javafx.com/javafx/25" xmlns:fx="http://javafx.com/fxml/1">
   <children>
      <HBox VBox.vgrow="NEVER">
         <children>
            <Label minWidth="100.0" text="Title" />
            <TextField fx:id="titleField" HBox.hgrow="ALWAYS" />
         </children>
      </HBox>
      <HBox>
         <children>
            <Label minWidth="100.0" text="Priority" />
            <ComboBox fx:id="priorityCombo" HBox.hgrow="ALWAYS" />
         </children>
      </HBox>
      <HBox VBox.vgrow="ALWAYS">
         <children>
            <Label minWidth="100.0" text="Description" />
            <TextArea fx:id="descriptionField" prefHeight="200.0" prefWidth="200.0" HBox.hgrow="ALWAYS" />
         </children>
      </HBox>
      <HBox alignment="TOP_RIGHT" spacing="10.0" VBox.vgrow="NEVER">
         <children>
            <Button fx:id="saveButton" mnemonicParsing="false" text="Save" />
            <Button fx:id="cancelButton" mnemonicParsing="false" text="Cancel" />
         </children>
      </HBox>
   </children>
   <padding>
      <Insets bottom="10.0" left="10.0" right="10.0" top="10.0" />
   </padding>
</VBox>
Creating the Controller Class
Once the view is ready, we also need a controller.
Create a new class called TaskEditController inside the controller package.
Remember that the class should implement the Initializable interface.
Add attributes corresponding to the components that were given fx:id values:
package fi.jyu.ohj2.name.todo.controller;

import fi.jyu.ohj2.nimi.todo.model.Prioriteetti;
import javafx.fxml.FXML;
import javafx.fxml.Initializable;
import javafx.scene.control.Button;
import javafx.scene.control.ComboBox;
import javafx.scene.control.TextArea;
import javafx.scene.control.TextField;

import java.net.URL;
import java.util.ResourceBundle;
// imports hidden...

public class TaskEditController implements Initializable {
    @FXML
    private TextField titleField;

    @FXML
    private ComboBox<Priority> priorityCombo;

    @FXML
    private TextArea descriptionField;

    @FXML
    private Button saveButton;

    @FXML
    private Button cancelButton;

    @Override
    public void initialize(URL location, ResourceBundle resources) {
    }
}
A few words about the new components.
TextArea is a multi-line text field. It behaves similarly to TextField but allows line breaks.
ComboBox<T> is a component that displays the contents of an ObservableList<T> as a drop-down menu.
Although the controller now exists, we have not yet told JavaFX that the FXML file and controller belong together. Return to SceneBuilder and open the Controller panel at the bottom of the Document view.
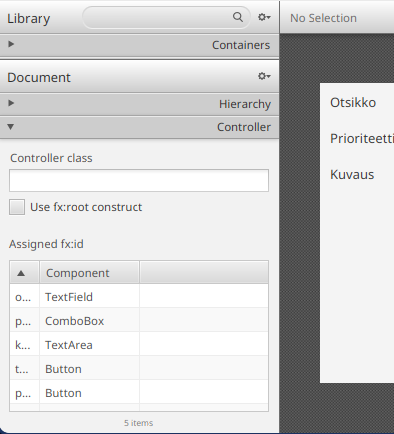
The Controller class setting determines which controller class is loaded whenever the view is loaded.
Set its value to:
fi.jyu.ohj2.name.todo.controller.TaskEditController
using your own package name.
Save the FXML file.
Now every time the edit view is displayed, JavaFX will automatically create a corresponding TaskEditController.
Opening the Dialog from the Main View
We would now like to open the dialog whenever a task in the table is double-clicked.
Unfortunately, TableView does not directly provide an event for clicking a row.
Instead, clicks occur on the TableRow object representing the individual row.
To customize rows, TableView provides the setRowFactory() method
(JavaDoc) .
The supplied lambda is executed whenever a new row is created.
The lambda should create and return a TableRow object.
This allows us to attach an onMouseClicked event handler to each row.
Add the following to the initialize() method of MainController where we initialize the columns:
taskTable.setRowFactory(tv -> {
    TableRow<Task> row = new TableRow<>();
    row.setOnMouseClicked(event -> {
        if (event.getButton().equals(MouseButton.PRIMARY)
                && event.getClickCount() == 2 && !row.isEmpty()) {
            Task task = row.getItem();
            openTaskEditor(task);
        }
    });

    return row;
});
Next, create the openTaskEditor() method:
private void openTaskEditor(Task task) {
    try {
        /* 1 */ FXMLLoader loader = new FXMLLoader(App.class.getResource("task-edit.fxml"));
        /* 1 */ Parent root = loader.load();
        /* 1 */ Scene scene = new Scene(root);

        /* 2 */ Stage dialog = new Stage();
        /* 2 */ dialog.setScene(scene);

        /* 3 */ dialog.setTitle("Edit Task: " + task.getTitle());
        /* 3 */ dialog.setMinWidth(400);
        /* 3 */ dialog.setMinHeight(300);
        /* 3 */ dialog.initModality(Modality.APPLICATION_MODAL);

        /* 4 */ dialog.showAndWait();
    } catch (IOException e) {
        throw new RuntimeException(e);
    }
}
Notice that the logic is essentially the same as the application startup code from Part 7.1, with a few differences:
- Initializing the view: Load it with
FXMLLoaderand create aScene. - Attaching the view to a window: Create a new
Stagemanually. - Adjusting window settings: Set title, minimum size, and make the window modal.
- Displaying the window: Use
showAndWait(), which blocks until the dialog closes.
Run the application. Double-clicking a row should now open the dialog.
Passing the Selected Task to the Dialog Controller
The dialog still cannot display task information because it knows nothing about the selected task.
We need to pass the selected Task object to the dialog controller.
Add a new attribute to TaskEditController:
public class TaskEditController implements Initializable {
    // HIGHLIGHT_GREEN_BEGIN
    private Task editedTask;
    // HIGHLIGHT_GREEN_END
For encapsulation reasons the field remains private. Add a public setter method:
public void setTask(Task task) {
    this.editedTask = task;
    titleField.setText(task.getTitle());
    priorityCombo.setValue(task.getPriority());
    descriptionField.setText(task.getDescription());
}
note
At this point, data binding could also be used:
titleField.textProperty().bindBidirectional(task.titleProperty());
However, then every key press would immediately modify the task. Since we want the user to be able to cancel changes, we copy values manually instead.
Let's return to the openTaskEditor() method in the MainController class.
Now, before creating the window, we can retrieve the TaskEditController instance and pass the task to be edited to it. We can obtain the controller instance created for the view by calling the getController() method of the FXMLLoader object (see the JavaDoc).
private void openTaskEditor(Task task) {
    // beginning hidden...
    FXMLLoader loader = ...
    Parent root = loader.load();
    Scene scene = new Scene(root);
    // HIGHLIGHT_GREEN_BEGIN
    TaskEditController controller = loader.getController();
    controller.setTask(task);
    // HIGHLIGHT_GREEN_END

    Stage dialog = new Stage();
    // remainder hidden...
}
Run the application again. Double-clicking a task should now open the dialog with the task information prefilled.
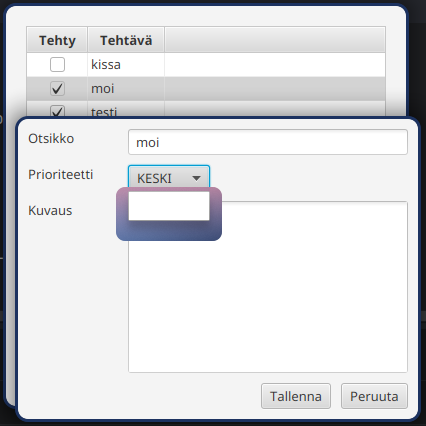
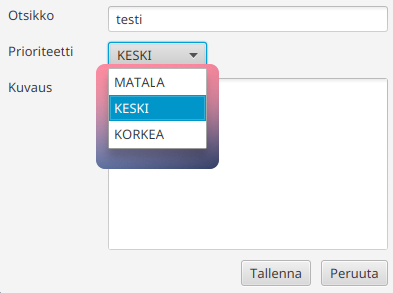
At this point, we notice a small bug: the priority drop-down box does not yet display all the available priority options. We can fix this by setting the Priority values displayed in the ComboBox component using the setItems() method, similarly to how we did earlier with the ListView component introduced in this chapter. Add the following line to the initialize() method of the TaskEditController class:
public void initialize(URL location, ResourceBundle resources) {
    priorityCombo.setItems(FXCollections.observableArrayList(Priority.values()));
}
Priority.values() returns all enum values (LOW, MEDIUM, HIGH).
Now all priority values are available in the drop-down list.
Implementing the Dialog Logic
Finally, let's implement the actual logic for the dialog in the TaskEditController class.
The edit dialog contains two buttons:
- The Save button stores the changes made to the task and closes the dialog. We must ensure that a task cannot be saved without a title. The description field, however, is optional.
- The Cancel button closes the dialog without transferring any information to the task object.
Let's begin by adding a helper method close() to TaskEditController, which closes the dialog, along with event handlers for the Save and Cancel buttons:
public void initialize(URL location, ResourceBundle resources) {
    priorityCombo.setItems(FXCollections.observableArrayList(Priority.values()));
    // beginning of method hidden...

    saveButton.setOnAction(event -> {
        editedTask.setTitle(titleField.getText());
        editedTask.setPriority(priorityCombo.getValue());
        editedTask.setDescription(descriptionField.getText());
        close();
    });

    cancelButton.setOnAction(event -> close());
}

private void close() {
    // Trick: retrieve the Scene object from any component
    Scene scene = titleField.getScene();
    // The Scene object's getWindow() method returns the current window.
    // We know that the window is a Stage, so we perform a cast.
    Stage window = (Stage)scene.getWindow();
    window.close();
}
Remember that a task must not be saved if the title field is empty.
Let's implement this check using user-friendly validation: if the title field is empty, we change the color of its border and display a clear warning message.
To accomplish this, create a helper method validate() that checks whether the title field is valid and returns a boolean indicating whether all fields are valid (true) or invalid (false).
If the title field contains no value, the field border is colored red and an error message is shown inside the field.
private boolean validate() {
    // Reset any previous error styles and prompt texts
    titleField.setStyle("");
    titleField.setPromptText("");

    String title = titleField.getText();
    if (title == null || title.isBlank()) {
        // Change the border color to red to indicate an error
        titleField.setStyle(
                "-fx-border-color: red; " +
                "-fx-background-color: #fdf2f2;"
        );
        // Display the error message as the prompt text
        titleField.clear();
        titleField.setPromptText("Title is missing!");
        // Return false to indicate validation failure
        return false;
    }

    return true;
}
We can now call validate() directly inside the Save button's event handler:
public void initialize(URL location, ResourceBundle resources) {
    // beginning of method hidden...
    priorityCombo.setItems(FXCollections.observableArrayList(Priority.values()));

    saveButton.setOnAction(event -> {
        // HIGHLIGHT_GREEN_BEGIN
        if (!validate()) {
            return;
        }
        // HIGHLIGHT_GREEN_END

        editedTask.setTitle(titleField.getText());
        editedTask.setPriority(priorityCombo.getValue());
        editedTask.setDescription(descriptionField.getText());

        close();
    });

    // rest of method hidden...

    cancelButton.setOnAction(event -> close());
}
Try running the application again. The Save and Cancel buttons should now function correctly. In addition, leaving the title field empty displays an error message to the user.
Saving Changes Made to Task Information
We now notice that editing task information through the dialog updates the values displayed in the table, but the changes are not yet saved to the file.
This happens because saving currently occurs only when the tasks list in TaskCollection changes.
The list currently changes only when:
a task is added,
a task is removed, or
the completed property changes,
as specified in the extractor:
private final ObservableList<Task> tasks =
    FXCollections.observableArrayList(
        task -> new Observable[] {task.completedProperty()}
    );
There are several ways to handle saving after dialog edits.
For now, let's keep the solution straightforward and add all properties of the Task class to the extractor:
private final ObservableList<Task> tasks =
        FXCollections.observableArrayList(
                task -> new Observable[] {
                        task.completedProperty(),
                        task.titleProperty(),
                        task.descriptionProperty(),
                        task.priorityProperty()
                }
        );
Now the tasks list reports changes to all task properties.
In other words, whenever any property of a task changes, the listener defined in TaskCollection saves all tasks.
Optional additional information: Saving after a short delay
The solution above is not ideal: every call to a setter method now triggers saving of the entire task collection.
One way to improve this using JavaFX is to introduce a so‑called debounce object.
A debounce prevents the same code from being executed repeatedly within a short time period.
For example, we can limit calls to save() so that it executes only once every 500 milliseconds.
JavaFX provides the helper class PauseTransition for this purpose:
private final PauseTransition saveDebounce = new PauseTransition(Duration.millis(500));

public TaskCollection() {
    // Define the code whose execution should be limited
    saveDebounce.setOnFinished(event -> save());

    tasks.addListener((ListChangeListener<Task>) change -> {
        // Execute the delayed action after 500 ms
        // If another change occurs within that period,
        // restart the timer.

        saveDebounce.playFromStart();
    });
}
With this change, multiple consecutive setter calls cause only a single execution of the save() method.
Return the project refactored in Exercise 8.4. Recap of the steps in this part:
- Open the task editing view when the user double-clicks a task.
- Add at least a description and a priority to the task.
- Add validation for user input (for example, the task title must not be empty).
- Save the changes back to the task and update the view.
When the phase is complete, run git add for the modified files and create a git commit.
Return your project files.