Interfaces
Learning Objectives
After completing this chapter, you will:
- Understand what an interface means in object-oriented programming.
- Be able to define and use interfaces in Java.
- Be able to use an interface as a method parameter and as a variable type.
- Understand when to use an interface instead of inheritance.
- Understand that a class can implement multiple interfaces but inherit only one class.
An interface acts as a binding contract: it defines which methods a class must provide without specifying how those methods are technically implemented. Unlike an abstract class, which provides a foundation for attributes and methods, an interface focuses on describing an object's capabilities. Interfaces make it possible to define common capabilities even when classes are completely different or belong to different inheritance hierarchies. When a programmer works with an object through its interface, they can rely on the object providing the agreed functionality regardless of the object's actual class.
Smart Home: Adjustable Devices
Let's continue the smart home example that we started in Part 3.
Some devices in our smart home could be adjustable, meaning that a value such as brightness, temperature, or volume can be set directly.
This is essentially what our Light class already does, where brightness changes between a few predefined values. From the perspective of the object's user, however, it would be more convenient if the brightness could be set directly to a desired value (for example, 33%) instead of repeatedly calling toggleState() and hoping to reach the correct setting.
For an end user, this would be similar to setting the desired brightness directly in a mobile application instead of repeatedly clicking Increase Brightness or Decrease Brightness buttons.
Let's define an interface called Adjustable, containing the method setValue(int value).
The file is saved as Adjustable.java, just like a class definition.
/**
 * A device that can be adjusted directly to a desired value.
 */
public interface Adjustable {
    void setValue(int value);
}
This can be read as follows:
Every class implementing the
Adjustableinterface must provide asetValue()method.
We can now modify the Light class to implement the Adjustable interface.
For simplicity, we will leave CoffeeMaker and SecurityCamera out of this example because we decide that they are not adjustable devices.
public class Main {
    public static void main() {
        Light light = new Light("PhilipsHue");
        light.setValue(33);
        light.reportState();

        light.toggleState();
        light.reportState();
    }
}
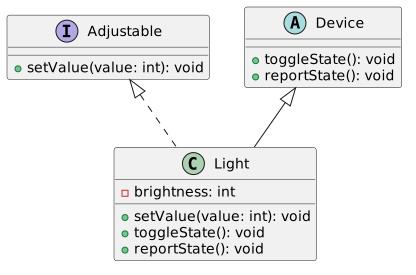
Our class diagram would now look like this. The letter I indicates an interface. Like abstract classes, interfaces are displayed in italics. Implementing an interface is represented with a dashed line ending in a hollow arrow pointing toward the interface.
Implementing Multiple Interfaces
A class can implement multiple interfaces.
For example, Java's built-in ArrayList class implements several interfaces:
List, RandomAccess, Cloneable and Serializable (see ArrayList class documentation).
Each interface describes a particular capability:
Listdefines basic list operations such as adding, removing, and retrieving elements.RandomAccessindicates that elements should be accessed efficiently by index.Cloneableallows an object to be cloned.Serializableallows an object to be stored in a file or transmitted over a network.
Similarly, Java's Date class also implements the Cloneable interface, allowing date objects to be cloned.
Notice that Date and ArrayList are otherwise unrelated classes, yet they both implement the same interface.
Let's create two interfaces of our own and classes that implement them.
Suppose we have user-interface components that can: be drawn on the screen, and be clicked with a mouse.
We define two interfaces: Drawable and Clickable.
These interfaces describe the capabilities of user-interface components.
Let's agree on the following:
a drawable component can draw itself and
a clickable component can process click events and highlight itself when the mouse cursor is over it.
/**
 * A component that can be drawn in the user interface.
 */
public interface Drawable {
    public void draw();
}
Notice that we neither know nor care how these methods are implemented.
Rendering could happen
in a graphical user interface,
in a text-based interface,
or even by writing output to a file.
All we need to know is that every class implementing Drawable provides a draw() method, and every class implementing Clickable provides clicked() and setHighlight() methods.
Let's continue by implementing Text, a user-interface component that displays only text.
/**
 * A drawable component displaying only text.
 */
public class Text implements Drawable {
    private String content;
    public Text(String content) {
        this.content = content;
    }

    @Override
    public void draw() {
        // Draw only the text content without a border
        IO.println(content);
    }
}
The benefits of interfaces are not yet fully apparent, partly because draw() is currently the only method provided by the Drawable interface.
Now, however, we can create another component: a Button, which is a box-shaped clickable button containing text.
The Button class implements both interfaces: Drawable and Clickable.
/**
 * A box-shaped clickable button
 * containing text.
 */
public class Button implements Drawable, Clickable {
    private String content;
    private boolean highlighted;

    public Button(String content) {
        this.content = content;
        this.highlighted = false;
    }

    @Override
    public void draw() {
        // Draw a rectangle and text
        if (!highlighted) {
            IO.println("[ " + content + " ]");
        } else {
            IO.println("[*" + content + "*]");
        }
    }

    /**
     * Handle a click event.
     */
    @Override
    public void clicked() {
        IO.println( "(The button labeled \"" + content + "\" was clicked)");
    }

    /**
     * Set the highlight state.
     * If the state changes,
     * redraw the component.
     */
    @Override
    public void setHighlight(boolean highlight) {
        if (this.highlighted == highlight) {
            return;
        }

        this.highlighted = highlight;
        this.draw();
    }
}
We now have two different user-interface components that can both be drawn on the screen.
In addition, the Button component is clickable.
Let's use these components in a main program.
/**
 * A component that can be drawn
 * in the user interface.
 */
public interface Drawable {
    public void draw();
}
Optional additional information: Moving drawing responsibility out of components.
The example above is somewhat artificial in the sense that user-interface components usually are not responsible for drawing themselves. Instead, rendering is often delegated to another part of the system. In such architectures, components merely provide the information needed for rendering, while another part of the system handles the actual drawing on the screen (or another presentation medium).
Let's modify our example accordingly.
We create a Screen class that keeps track of all user-interface components currently visible.
/**
 * The Screen class manages drawable components.
 */
public class Screen {
    private ArrayList<Drawable> components = new ArrayList<>();

    public void addComponent(Drawable component) {
        components.add(component);
    }

    public void removeComponent(Drawable component) {
        components.remove(component);
    }
}
Next, we create a Renderer class that acts as an intermediate layer between Screen and the user-interface components.
The Renderer is responsible for drawing components correctly. In this example, rendering simply prints output to the console, but in a real application it could render graphics to a graphical display.
/**
 * Responsible for rendering the drawing surface.
 */
public class Renderer {
    public void drawButton(String text, boolean highlighted) {
        if (!highlighted) {
            IO.println("[ " + text + " ]");
        } else {
            IO.println("[*" + text + "*]");
        }
    }

    public void drawText(String text) {
        IO.println(text);
    }

    public void clear() {
        IO.println("Clearing drawing area");
        // Left unimplemented
    }
}
The Screen class can now use the Renderer whenever components need to be displayed.
Let's add an update() method that goes through every component currently on the screen and asks it to render itself using a Renderer object.
import java.util.ArrayList;

/**
 * The Screen class manages drawable components.
 */
public class Screen {
    private ArrayList<Drawable> components = new ArrayList<>();
    // HIGHLIGHT_GREEN_BEGIN
    private Renderer renderer = new Renderer();
    // HIGHLIGHT_GREEN_END

    public void addComponent(Drawable component) {
        components.add(component);
    }

    public void removeComponent(Drawable component) {
        components.remove(component);
    }

    // HIGHLIGHT_GREEN_BEGIN
    public void update() {
        renderer.clear();
        for (Drawable component : components) {
            component.draw(renderer);
        }
    }
    // HIGHLIGHT_GREEN_END
}
Notice that the Drawable interface's draw() method must now receive a Renderer object as a parameter.
This allows components to use the renderer for drawing.
public interface Drawable {

    // HIGHLIGHT_GREEN_BEGIN
    public void draw(Renderer renderer);
    // HIGHLIGHT_GREEN_END
}
Now comes the important part:
As a consequence of this change, the draw() methods of Text and Button no longer print anything themselves. Instead, they call methods of the Renderer object.
/**
 * A drawable component
 * displaying only text.
 */
public class Text implements Drawable {
    private String content;

    public Text(String content) {
        this.content = content;
    }

    /**
     * Draw the component.
     *
     * @param renderer Renderer
     */
    @Override
    // HIGHLIGHT_GREEN_BEGIN
    public void draw(Renderer renderer) {
        renderer.drawText(content);
    }
    // HIGHLIGHT_GREEN_END
}
A corresponding change must also be made to the Button class.
In our simplified example everything is still rendered by printing to the console. In a real graphical user interface, however, the Renderer class could use a graphics library such as JavaFX or Swing for actual rendering.
Interface Inheritance
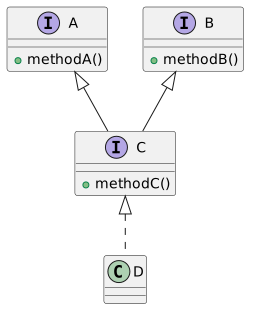
An interface can also extend (inherit from) another interface.
Syntactically, this is done using the extends keyword, just as with classes.
Unlike classes, however, an interface may inherit from multiple interfaces.
A subinterface automatically inherits all methods declared in its parent interfaces.
The following synthetic example demonstrates this.
Notes
Optional additional information: default method implementations
Starting with Java 8, interfaces can also contain default method implementations. This feature can be useful when adding a new method to an existing interface without breaking older implementations. Read more about this in Java documentation
Exercises
-
Create an interface named
Converter. Define a single method in the interface:String convert(String input);Remember that methods in an interface do not have a body (no curly braces{}). -
Create the classes
Lowercase,Uppercase, andCapitalize, which implement theConverterinterface.- The
convertmethod of theLowercaseclass converts the given string to lowercase.convert("Hello World")->"hello world". - The
convertmethod of theUppercaseclass converts the given string to uppercase.convert("Hello World"->"HELLO WORLD". - The
convertmethod of theCapitalizeclass converts the given string so that only the first letter is uppercase and all other letters are lowercase.convert("HELLO WORLD")->"Hello world"
- The
-
Test your program using the provided main program.
Spies send messages to each other, but the encryption method changes daily so that the enemy cannot figure out the logic. We need an interface that allows us to switch the encryption algorithm on the fly.
- Create an interface
Encryptor. Define the following two methods in the interface:
String encrypt(String message);
String decrypt(String encryptedMessage);
-
Implement three different classes:
Reverser,Hacker, andNextLetter, which implement theEncryptorinterface using the following logic:-
Reverser (Mirror Writing) Reverses a word or message. Example: "Agent" → "tnegA" Hint: You can use the
reverse()method of theStringBuilderclass or a loop that processes the string from end to beginning. -
Hacker ("Leet Speak") Replaces certain letters with numbers or symbols. "Agent" → "@g3nt"
-
'a' -> '@'
'e' -> '3'
'i' -> '!'
'o' -> '0'
- NextLetter (Caesar Shift)
Moves each letter one position forward in the alphabet.
Example: abc -> bcd.
Hint: In Java,
charis a numeric type, so you can use:character + 1.
Examples:
'a' -> 'b'
'b' -> 'c'
'k' -> 'l'
and so on.
In this exercise, you do not need to worry about wrapping around the alphabet for letters such as z, å, ä, or ö, unless you want to.
You also do not need to worry about encryption and decryption always restoring the exact original message. For example, when using the Hacker encryptor, if the original message actually contains the character @, the decrypt() method will convert it to a. This is acceptable for this exercise, although a real encryption system should ensure that no information is accidentally lost or altered.
A main program is provided in TIM for testing your class structure.